为Python画的图注入数学公式。
# 序
大部分时候我使用 OFFICE 进行文本写作或编辑,然而当利用 Matplotlib 出带公式或数学符号的图时需要用到LATEX,因此该贴将着重记录如何编辑数学公式或符号。
参考极客鸭geekDuckKonig的视频讲解。
# 核心语法
粗体、斜体与下划线
# 粗体
\textbf{我是粗体}
# 斜体
\textit{我是斜体}
\emph{我是斜体/花体}
# 下划线
\underline{我是下划线}
# 嵌套
\textbf{\textit{我是粗体+斜体}}
图片
可以说 \begin 开始了一个环境,对于该环境可以其后的 [] 中添加参数
\begin{figure} # 可以在后面加[h],决定环境位置,h代表here。此外还有t,代表top;b代表bottom
  \centering # 可以有左右对齐(raggedright)
  \includegraphics[width=5cm, height=3cm]{image/earth.jpg}
  \includegraphics[]{} #可以插入多张图片
  \caption{我是说明文字}
  \label{fig:earth}
\end{figure}
列表
# 无序列表
\begin{itemize}
  \item 任务a
  \item 任务b
\end{itemize}
# 有序列表
\begin{enumerate}
  \item 任务a
  \item 任务b
\end{enumerate}
内部索引
引用文章中出现的表格或图片,则使用 ref{label} 。
这里内部索引一个图片\ref{fig:matrix_f},它的label为fig:matrix_f外部索引
引用外部的文献资料。
超链接要使用hyperref包,如:\href{https://cnki.net/}{中国知网}
参考文献核心:BiBTex包
参考文献拓展:NatBiB包
# 数学公式
在LATEX行文中使用 $ 以插入公式,打印美元符号则需要使用转义符 \ 。此外,还可以使用公式环境来插入数学公式。
# 方式1
\LaTeX 文本段落内
如下公式:$E=m\cdotc^2$
# 方式2
\begin{equation}\label{eq1}
e^{i\pi}+1=0
\end{equation}
使用 align 环境来对齐数学公式的格式(等号对齐)。
\begin{align}
E&=m\cdotc^2\\
 &=m\timesc\timesc
\end{align}
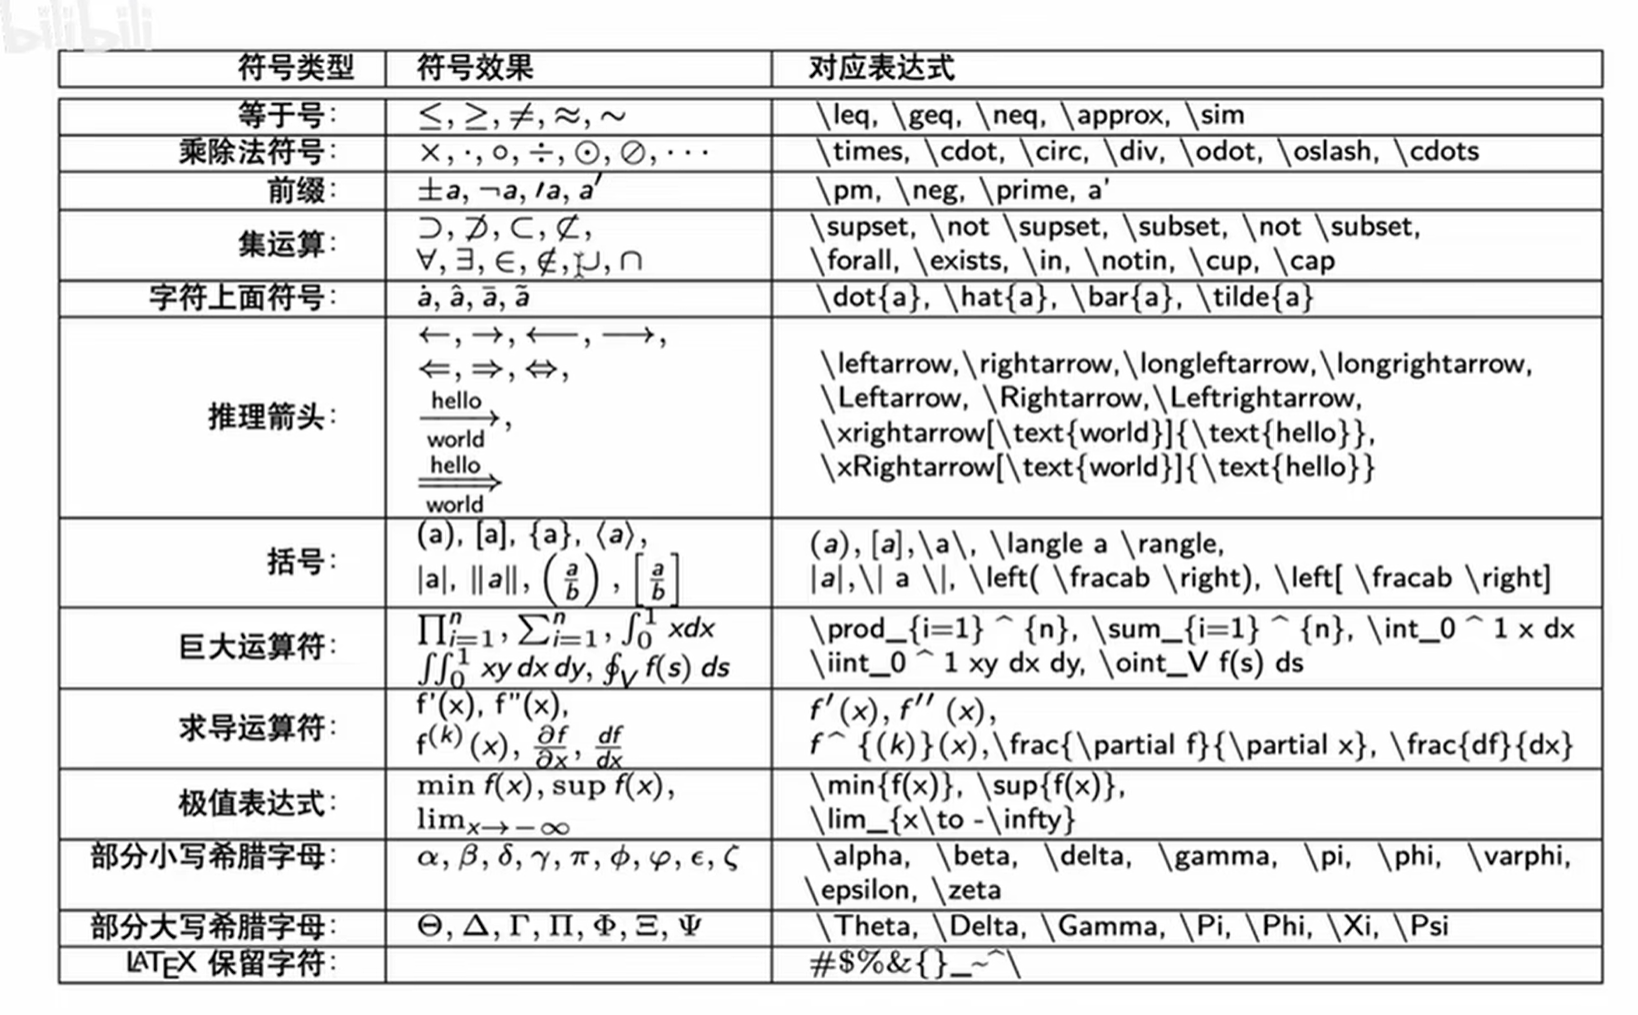
下图展示了常用数学公式与符号的代码。

括号的使用方式
\begin{align}\qquad\frac{\partial}{\partial w}\left( l(\textbf{w},b)+\frac{\lambda}{2}\lVert\textbf{w}\rVert^2 \right)=\frac{\partial l(\textbf{w},b)}{\partial w}+\lambda w\end{align}
注意其中的 \left( 和 \right(
更改公式大小
$$\huge E=m\cdot c^2$$
$$\large E=m\cdot c^2$$
$$\normalsize E=m\cdot c^2$$
$$\small E=m\cdot c^2$$
$$\footnotesize E=m\cdot c^2$$
$$\scriptsize E=m\cdot c^2$$
$$\tiny E=m\cdot c^2$$
累加符号样式
\displaystyle\sum_{i=1}^n
\textstyle\sum_{i=1}^n
分别对应[latex]\displaystyle\sum_{i=1}^n[/latex]与[latex]\textstyle\sum_{i=1}^n[/latex]。
花括号内好几行
主要是 \begin{case} 。
\begin{align}& \large \textbf{无偏差地加入噪音}\\& \large \centerdot\text{对x加入噪音得到}x'\text{,我们希望}\\& \huge \qquad E\lbrack x'\rbrack=x\\& \large \centerdot \text{丢弃法对每个元素进行如下扰动}\\& \large \qquad x_i'=\begin{cases}0 &\text{with probability } p \\ \frac{x_i}{1-p} &\text{otherwise}\end{cases}\end{align}矩阵(分为多行,但没有花括号)
\begin{matrix}\mathbb{E}[h_i^t]=0\\\text{Var}[h_i^t]=a\end{matrix}
\begin{array}{cc} a & b \\ c & d \end{array}
黑板粗体
成为一名数学老师😎。[latex]\mathbb{E}=0[/latex]
\mathbb{E}\left\lbrack\frac{\partial l}{\partial h_i^t}\right\rbrack=0类似于注释,放在正下方
$$\underset{\theta_0,\theta_1}{\text{minimize}}J(\theta_0,\theta_1)$$$$\underset{\theta_0,\theta_1}{\text{minimize}}J(\theta_0,\theta_1)$$
放在正上方
$$\overset{\text{I'm the upper one}}{\text{the one below}}$$$$\overset{\text{I’m the upper one}}{\text{the one below}}$$
画表格
# |c|c|c|是表格的竖线边框,\hline是横线边框
\begin{array}{|c|c|c|}\hline 0 & 1 & 2 \\ \hline 3 & 4 & 5 \\ \hline \end{array}
# 一行内画多个表格
$$\begin{array}{|c|c|c|}\hline 0 & 1 & 2 \\ \hline 3 & 4 & 5 \\ \hline 6 & 7 & 8 \\ \hline \end{array} \times \begin{array}{|c|c|}\hline 0 & 1 \\ \hline 2 & 3 \\ \hline \end{array}$$
颜色及背景颜色
$$\require{color} \colorbox{cyan}{here's the text mode}$$
$$\require{color} \colorbox{cyan}{[latex]E=mc^2[/latex]}$$
$$\require{color} \colorbox{cyan}{$E=mc^2$}$$  # 同上,建议用该方式
$$\require{color} \colorbox{#87ceeb}{$E=mc^2$}$$  # 自定义颜色
$$\require{color} \colorbox{cyan}{here’s the text mode}$$
$$\require{color} \colorbox{cyan}{[latex]E=mc^2[/latex]}$$
$$\require{color} \colorbox{cyan}{$E=mc^2$}$$
# LATEX的结构
Preamble
序言部分,指定文章类型、纸张排版、日期、作者、扩展包、定义新变量等。
Body
文章部分。
- 基本是 \begin{section} … \end{section} 包裹的环境
- 环境内的风格覆盖环境外的风格;环境结束后回到原来外面的风格。
- 对于文章,分为 section 、 subsection 等
- 使用 \\ 或 \newline 进行换行
- 使用 \newpage 或 \pagebreak 换页,其中前者不会将段落一分为二
- 使用 \noindent 取消段落缩进,多个空格会被当作一个空格
实例
在LATEX中使用 % 注释文字,上文都用的 # 来注释文字,但懒得改了。
\documentclass[11pt,a4]{ctexart}  % 字体大小为11,纸张为a4,因为是中文文档所以使用ctexart这一文档类别。英文文章里面就填article

\title{标题}
\author{作者}
\date{\today}

\usepackage{amsmath}  % 处理更多数学符号
\usepackage{graphicx}  % 导入图片
\usepackage{biblatex}  % 管理索引
\usepackage{natbib}  % 支持更灵活的英文引用格式(如:句中、句尾引用)
\usepackage{ref.bib}  % 这是当前目录下的ref.bib文件,里面有bib格式的参考文献
\usepackage{geometry}  % 帮助设置页面边界等
\geometry{a4, landscape, margin=0.5in}
\usepackage{multicol}  % 类似Wordpress中的Columns设置多列


\begin{document}  % 以下是行文部分
\maketitle  % 打印标题

\begin{abstract}
  这是摘要
\end{abstract}

% 标题的级别
\section{一级标题}
\subsection{二级标题}
\subsubsection{三级标题}
\paragraph{四级标题}
\subparagraph{五级标题}
\subsection*{舍弃编号的标题}

% 文献引用
这是一篇马里奥的文章 \cite{bib文件里article的名称},揭示了绿地公平性空间变化。


\printbibliography[title=参考文献]  % 打印参考文献

\end{document}
# 更多资料
# 在WordPress中使用LaTex
引入 WordPress 的方式详见此处。
行内的内联公式
[latex]\begin{equation}1\times 1\end{equation}[/latex]
[latex]1\times 1[/latex]
$1\times 1$
独立公式
# 方式_1
$$E=m\cdot c^2$$
# 方式_2
\begin{equation}E=m\cdot c^2\end{equation}多行公式,等号对齐
\begin{align}E&=m\cdot c^2\\ &=m\times c\times c\end{align}不再将每一行居中,并对特定行进行缩进:
\begin{align}
& \textbf{initialize}\,w=0\text{ and }b=0\\
& \textbf{repeat}\\
& \quad \textbf{if}\,y_i[<w,x_i>+b]\leq0\,\textbf{then}\\
& \qquad w\gets w+y_1x_i\text{ and }b\gets b+y_i\\
& \quad \textbf{end if}\\
& \textbf{until}\text{ all classified correctly}
\end{align}
# 在WordPress帖子中使用一行
\begin{align}& \textbf{initialize}\,w=0\text{ and }b=0\\& \textbf{repeat}\\& \quad \textbf{if}\,y_i[<w,x_i>+b]\leq0\,\textbf{then}\\& \qquad w\gets w+y_1x_i\text{ and }b\gets b+y_i\\& \quad \textbf{end if}\\& \textbf{until}\text{ all classified correctly}\end{align}
注意其中的 & 和 \quad 。
在\text{}中输入公式
# 在{}中加入\(公式\)
\text{for \(i=1,\dots ,c_o\)}
粗斜体
$$\textbf{\(\textit{Pooling Layer}\)}$$在小代码块内调用MathJax
[lCode]可以认为每个输出通道识别一个特定的\(\textit{Pattern}\)[/lCode]。设置独立多行公式整体字体大小
应使用$$$$包括整个mathjax块,并且在\begin{}之前设置字体大小。也可以分行设置字体大小,在&后输入\large即可
$$\large \begin{align}\end{align}$$
给公式打标签
与在 Word 中使用\(\text{#}\)实现的功能一致。
# 自动标签
\begin{equation*} a=1\end{equation*}

# 手动标签
\begin{equation} a=2\tag{1} \end{equation}